A distraction from Eunice - Blog Post 2 100 Day project
- Jane

- Feb 19, 2022
- 3 min read
We live across the road from The Atlantic, she's there in all her glory when we wake up and the last thing I look at before I go to bed is the moon glinting on the surface (or deep pitch black if there's no moon !) The power of the sea is awesome, and scary, so we followed advice and hunkered down this week during the storm, though when it subsided we went out for a glorious, windy beach walk.

You can still see the sea spray being whipped across the breaking waves and just after I took this a rogue gust nearly knocked me over!
As my studio is unheated and exposed I brought some art supplies into the AGA warmed kitchen and carried on with #the100dayproject "100 days of snips on book pages"
What have I learnt so far?
1- I have a tendency to treat each artwork as a finished piece (my fondness for vintage paper means that I can't bear to waste or ruin a piece!)
2- This is creating a bit of stress as I'm taking much longer than the 1 hour I'd allotted in the day. The point of this project is exploratory, a warm up, and most importantly something that takes up a minimum of time as there are lots of other things I need to be working on.
So, I had a bit of a stern talk to myself (do you talk to yourself?!) and I decided to just slightly alter my perception. The 100 Day Project says nothing in its title about being 100 pieces of finished art I'm just committing to a project that lasts 100 days. That's easier! So each day I'm now going to spend up to an hour (with a timer) on the project and then put it away and get on with the rest of my day. No pressure to finish something in that hour but if I do I do.
Already I'm enjoying it more and feeling relaxed. A happy artist makes happy art!
Also I've decided that I'll change focus every 7-10 days which will keep everything fresh and hopefully keep the learning to a maximum.

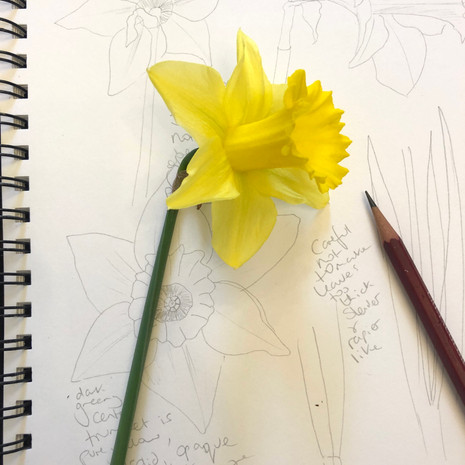


This week it's all about observation and sketching. I've chosen florals as a subject as it was my birthday at the beginning of Feb so I've got flowers in the house plus lots of flowers beginning to bloom in the garden. If you want to play along my process is as follows:
1- Observe your subject, look closely; at shapes, colours, how it is constructed. Deconstruct it if possible, count things, leaves, petals etc Note textures, the relative weight and thickness of petals and leaves. Variations in colour and tone and markings.
2- Keep looking and observing
3- Keep looking and observing !
4- Keep looking and observing whilst you make visual and written notes, the more you look the more you'll remember.
I aim to fill a page in an A4 sketchbook with notes and sketches and I use these to distill the flower into key shapes so it is recognisable when collaged.
Another game to play is blind contour drawing - a piece of paper, an object and a pencil. Draw the object whilst looking at it but DON'T take your eyes off it. I love this as a warm up, you can see a little one on the tulip pic above (I added the stalk after) Spend a few minutes a day and you'll quickly tune your eyes into "seeing" better.
Hope this was useful, please get in touch if you've got queries or anything you'd like me to cover or expand upon in a future post.
Blog Post 3 - Creating a routine/the collage process


Comments